Here we are going to setup a multi-node fully distributed Cloudera Hadoop cluster configured with "MySQL" as external database. We will also configure our cluster to authenticate using Kerberos and authorize using OpenLDAP as additional security implementations.
Note: Internet connectivity is required for namenode and the above mentioned configuration serves the purpose for our setup.


Open a browser on any node and check that httpd server is working for CentOS-6.8 local repository.


ENVIRONMENT SETUP & CONFIGURATION
Operating System: CentOS-6.8
Cloudera Manager Version: 5.9.1
CDH Version: 5.9.1
We will create three virtual machines as namenode, datanode1 and datanode2 respectively using VirtualBox. Cloning of virtual machines can also be performed in order to save time. Below is the required overall configuration of virtual machines.
We will create three virtual machines as namenode, datanode1 and datanode2 respectively using VirtualBox. Cloning of virtual machines can also be performed in order to save time. Below is the required overall configuration of virtual machines.
VM1
|
VM2
|
VM3
|
|
Role
|
Namenode
|
Datanode1
|
Datanode2
|
Hostname
|
nn.cdh.demo
|
dn1.cdh.demo
|
dn2.cdh.demo
|
Memory
|
6G
|
3G
|
3G
|
Disk
|
60G
|
60G
|
60G
|
No of network interfaces
|
02
|
01
|
01
|
Adapter1 (Private)
|
Host-Only
|
Host-Only
|
Host-Only
|
Adapter2 (Public)
|
NAT
|
None
|
None
|
IP Address (Private)
|
192.168.56.101
|
192.168.56.111
|
192.168.56.112
|
IP Address (Public)
|
DHCP
|
DHCP
|
DHCP
|
Note: Internet connectivity is required for namenode and the above mentioned configuration serves the purpose for our setup.
i) Operating System Configuration
OS Partitioning
We are following the below partition table for our lab setup and this is not the recommended partitioning scheme to be followed in standard installation environments. The partition table layout varies upon the requirement.
OS Local Repository Configuration
Location: Namenode (nn.cdh.demo)
Starting the HTTP service and persisting it across reboots.
# service httpd start
# chkconfig httpd on
Mount the CentOS-6.8 ISO image in the namenode.

Create a directory
in "/var/www/html" directory
# mkdir
/var/www/html/CentOS-6.8
Copy the contents of
the DVD to "/var/www/html" directory
# rsync -arvp --progress /media/CentOS_6.8_Final/*
/var/www/html/CentOS-6.8/
Location: All nodes
Creating the repo
file
# vi
/etc/yum.repos.d/centos68local.repo
[CentOS-6.8_LocalRepository]
name=CentOS-6.8_LocalRepo
baseurl=http://192.168.56.101/CentOS-6.8
enabled=1
gpgcheck=0
Location: All nodes
Move the previous OS
repo files to a backup location
# mkdir
/etc/yum.repos.d/repobkp
#
mv /etc/yum.repos.d/CentOS-* /etc/yum.repos.d/repobkp
Verification
# yum
repolist

Open a browser on any node and check that httpd server is working for CentOS-6.8 local repository.

Dependency Installation
Location:
All nodes
The
following dependencies need to be installed before we proceed further. The
following packages are installed based upon our requirement for the
installation of CDH. It is not a standard practice to install the same packages
and it may vary according to the individual or customer requirement.
# yum
install openssh* openssl* httpd elinks epel-release pssh createrepo wget ntp
ntpdate ntp-doc yum-utils mod_ssl
# yum groupinstall
"Development Tools"
# yum update -y
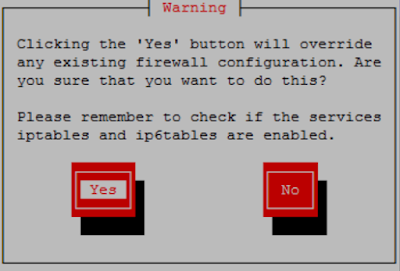
Disabling Firewall
Location: All nodes
It is recommended to
disable firewall. Run the below command to start setup utility.
# setup


# service iptables
stop
# service ip6tables
stop
# chkconfig iptables
off
# chkconfig
ip6tables off
Disabling Network Manager
# service
NetworkManager stop
#
chkconfig NetworkManager off
Disabling Selinux
Location: All nodes
It is recommended to
disable SElinux
# vi
/etc/sysconfig/selinux
Configuring File Descriptor & ulimits
Location: All nodes
The recommended
value of open file descriptors is "10000" or more. If the values are
not greater than or equal to 10000, run the below to set the value to
"10000".
Verifying the ulimit
values.
# ulimit
-Sn
# ulimit
-Hn
Configuring the
ulimit value.
# ulimit -n 10000
Configuring hosts file
Location: All nodes
The /etc/hosts file
should be edited in below format.
<ip-address> <FQDN>
<Short Name>
A sample /etc/hosts
file is shown below.
# vi /etc/hosts
127.0.0.1 localhost localhost.localdomain localhost4
localhost4.localdomain4
::1 localhost localhost.localdomain
localhost6 localhost6.localdomain6
192.168.56.101 nn.cdh.demo nn
192.168.56.102 dn1.cdh.demo dn1
192.168.56.103 dn2.cdh.demo dn2
NTP Configuration
Location: All nodes
The clocks on all
the nodes in the cluster must synchronize with each other for time
synchronization across the cluster.
# service ntpd start
# chkconfig ntpd on
# ntpdate
pool.ntp.org
Set the date using below example.
# date -s "01 MAY 2017 00:20:00"
# hwclock -w
# hwclock -r
# date
Set the date using below example.
# date -s "01 MAY 2017 00:20:00"
# hwclock -w
# hwclock -r
# date
SSH Configuration (Optional)
Location: Namenode
(nn.cdh.demo)
Everytime
we login to a server, it asks for permission to login to the new host. To avoid
answering "yes/no", we can modify "StrictHostKeyChecking" parameter value to "no" in ssh_config file as shown
below.
# vi
/etc/ssh/ssh_config
StrictHostKeyChecking
no
OS Kernel Tuning
Location: All nodes
Disable
Host Swappiness
This
linux parameter controls how aggressively memory pages are swapped to disk. The
value can be between 0-100. The higher the value, the more aggressive is kernel
in swapping out inactive memory pages to disk which can lead to issues like
lengthy garbage collection pauses for important system daemons because swap space is much slower than memory as it is backed by disk
instead of RAM. Cloudera recommends setting this
parameter to "0", but it has been found that in recent kernels
setting this to "0" causes out-of-memory issues
(Ref: Link)
To change
the swappiness value to "10" edit the "sysctl.conf" file as
mentioned below.
# vi
/etc/sysctl.conf
vm.swappiness=10
Disable
Transparent Huge Pages Compaction
THP is
known to cause 30% CPU overhead and can seriously degrade system performance.
It is recommended by both Cloudera and Hortonworks to disable THP to reduce the
amount of system CPU utilization on the
worker nodes.
Run the
below mentioned command to disable transparent huge pages.
# vi
/etc/rc.local
# vi /etc/rc.local
if
test -f
/sys/kernel/mm/transparent_hugepage/enabled; then echo never >
/sys/kernel/mm/redhat_transparent_hugepage/enabled
fi
if
test -f
/sys/kernel/mm/transparent_hugepage/defrag; then echo never >
/sys/kernel/mm/redhat_transparent_hugepage/defrag
fi
Verification
of defined kernel specific parameters
# sysctl
-p | grep vm.swappiness
# cat
/sys/kernel/mm/transparent_hugepage/defrag
Improve
Virtual Memory Usage
The
vm.dirty_background_ratio and vm.dirty_ratio parameters control the percentage
of system memory that can be filled with memory pages that still need to be
written to disk. Ratios too small force frequent IO operations, and too large
leave too much data stored in volatile memory, so optimizing this ration is a
careful balance between optimizing IO operations and reducing risk of data
loss.
# vi
/etc/sysctl.conf
vm.dirty_background_ratio=20
vm.dirty_ratio=50
Configure
CPU Performance Scaling
CPU Scaling is
configurable and defaults commonly to favor power saving over performance. For
Hadoop clusters, it is important that we configure then for better performance
over other options.
# cpufreq-set -r -g performance
Or
#
vi /sys/devices/system/cpu/cpu*/cpufreq/scaling_governor
performance
ii) Installing VirtualBox Guest Additions
Location:
All nodes
The
VirtualBox Guest Additions consist of device drivers and system applications
that optimize the operating system for better performance and usability.
Proceeding without installing VirtualBox Guest Additions is safe and does not
hamper our proceedings but still we recommend to do so for convenient usage
purpose of the user.
# cd
/media/VBOXADDITIONS_5.1.14_112924/
#
./VBoxLinuxAdditions.run
iii) VM Cloning
Note down
the MAC address
# vi
/etc/sysconfig/network
# vi
/etc/sysconfig/hosts
# vi
/etc/sysconfig/network-scripts/ifcfg-eth0
Change ip
and comment UUID & HWADDR
# vi
/etc/udev/rules.d/70-persistent-net.rules
Comment
the old MAC addresses and rename the interface names to eth0 & eth1
If the
machines are not cloned and installed separately, it might be tedious work
copying files and configuring parameters on each and every machine exclusively.
Though we can use a for loop for the same, but the parallel shell comes handy
with the operating system and can be used for the purpose conveniently as an
alternate.
Example:
#
pscp.pssh -h hosts -l root /etc/hosts /etc
# pssh -h
hosts -i -l root hostname
iv) Passwordless-SSH Configuration
Location: Namenode
(nn.cdh.demo)
After the cloning of
virtual machines, we need to setup a passwordless-SSH environment exclusively
for "root" user on the namenode. Configuring passwordless-SSH
environment is a mandatory requirement of namenode to start various hadoop
daemons across the cluster. Run the below mentioned commands to setup
passwordless-SSH.
Generate SSH key for
root user
# ssh-keygen -t rsa
Generating
public/private rsa key pair.
Enter file in which
to save the key (/root/.ssh/id_rsa):
Enter passphrase
(empty for no passphrase):
Enter same
passphrase again:
Your identification
has been saved in /root/.ssh/id_rsa.
Your public key has
been saved in /root/.ssh/id_rsa.pub.
The key fingerprint
is:
45:9e:72:ac:72:f8:57:44:c1:bc:8e:42:c9:64:97:19
root@cdh1.demo.lab
The key's randomart
image is:
+--[ RSA 2048]----+
| E*o.
|
| o++oo
|
| +.o* ..
|
| .+= ..
|
| o.S
o. |
| +. ...
|
| ...
|
| .
|
| |
+-----------------+
#
Copy the SSH key to
all other nodes
# ssh-copy-id -i
/root/.ssh/id_rsa.pub root@dn1.cdh.demo
# ssh-copy-id -i
/root/.ssh/id_rsa.pub root@dn2.cdh.demo
Self
passwordless-SSH for namenode
# ssh-copy-id -i
/root/.ssh/id_rsa.pub root@nn.cdh.demo
Testing Passwordless-SSH Environment
Try logging into the
datanodes from namenode machine. Also check the self passwordless-SSH into
namenode. All the listed below commands should login into the respective
machines without asking for a password.
[root@nn1 ~]# ssh
nn1
[root@nn1 ~]# ssh
dn1
[root@nn1 ~]# ssh
dn2
v) Java Installation Using Alternatives
Location: All nodes
Check the java prerequisites for your cdh version from this link. Currently our version supports minimum version Oracle JDK1.8_31 and Oracle JDK1.7_55. The excluded versions are Oracle JDK1.8_40/JDK1.8_45. Cloudera Manager can self install Oracle JDK1.7_67 during installation and upgrade.
Download java from the this link and place the java tarball in /opt directory.
# cd /opt
# tar -xzvf jdk-8u121-linux-x64.tar.gz
# alternatives --install /usr/bin/java java /opt/jdk1.8.0_121/bin/java 300000
Select the latest installed java version as default java using below command.
# alternatives --config java

Setting paths
# vi /etc/profile.d/oracle_jdk1.8.0_121.sh
#!/bin/bash
export JAVA_HOME=/opt/jdk1.8.0_121/
export PATH=$PATH:$JAVA_HOME/bin
Execute the java profile
# source /etc/profile
# echo $JAVA_HOME
/opt/jdk1.8.0_121/
Verifying Java Installation
Run the commands mentioned in the screenshot to identify the Java version.


vi) Identifying Python Installation
A minimum version of Python 2.4 is required by cloudera manager. But many other components of Hadoop are dependent upon Python 2.6. Currently the cloudera manager does not support Python 3.0 and higher.
Issue the command listed in the below screenshot to verify the python version.

INSTALLATION & CONFIGURATION OF MYSQL DATABASE
Location: Namenode (nn.cdh.demo)
i) Installation Using Internet based YUM
Cloudera Manager & other big data components like HIVE, OOZIE & HUE, all require SQL based datastore to store their metadata. For production cluster it is recommended to use external database instead of embedded database. For database version and compatibility matrix you need to check Cloudera official version specific documents. It is also recommended to have one DB instance per cluster, but in production if you have HA configured for your DB instances you can use that DB for multiple cluster setups. Requirement varies based on scenario.
If OS default MySQL is not supported then download required version of MySQL rpm bundle from here. Whereas you can also install MySQL server packages via YUM or RPM.
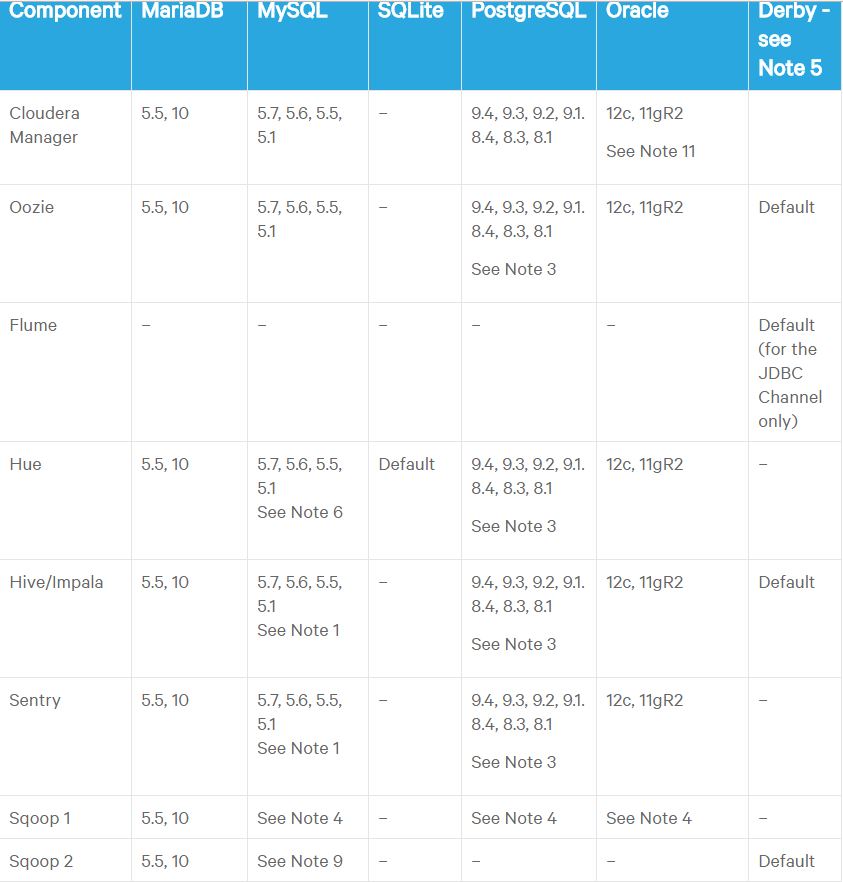
Before going forth, check the version of MySQL that is supported by CDH 5.9.1. Click here to find the compatible version. The compatible versions of MySQL that are supported by CDH 5.9.1 are 5.7/5.6/5.5/5.1. By default MySQL 5.1 comes from the operatin system repository. Below is the Cloudera supported database matrix for further information.
Download the relevant YUM repository rpm for CentOS 6.8 from this link or alternatively using wget command as mentioned below.
# wget -c https://dev.mysql.com/get/mysql57-community-release-el6-9.noarch.rpm
Install the repository rpm
# rpm -ivh mysql57-community-release-el6-9.noarch.rpm
Now we have to make sure that the MySQL 5.6 repository is properly configured.
Edit the "mysql-community.repo" file in /etc/yum.repos.d/ location. Ensure that "MySQL Connectors Community", "MySQL Tools Community" & "MySQL 5.6 Community Server" repositories are only enabled and rest all are disabled. Below shown is a sample file for reference.
# cat /etc/yum.repos.d/mysql-community.repo
[mysql-connectors-community]
name=MySQL Connectors Community
baseurl=http://repo.mysql.com/yum/mysql-connectors-community/el/6/$basearch/
enabled=1
gpgcheck=1
gpgkey=file:///etc/pki/rpm-gpg/RPM-GPG-KEY-mysql
[mysql-tools-community]
name=MySQL Tools Community
baseurl=http://repo.mysql.com/yum/mysql-tools-community/el/6/$basearch/
enabled=1
gpgcheck=1
gpgkey=file:///etc/pki/rpm-gpg/RPM-GPG-KEY-mysql
# Enable to use MySQL 5.5
[mysql55-community]
name=MySQL 5.5 Community Server
baseurl=http://repo.mysql.com/yum/mysql-5.5-community/el/6/$basearch/
enabled=0
gpgcheck=1
gpgkey=file:///etc/pki/rpm-gpg/RPM-GPG-KEY-mysql
# Enable to use MySQL 5.6
[mysql56-community]
name=MySQL 5.6 Community Server
baseurl=http://repo.mysql.com/yum/mysql-5.6-community/el/6/$basearch/
enabled=1
gpgcheck=1
gpgkey=file:///etc/pki/rpm-gpg/RPM-GPG-KEY-mysql
[mysql57-community]
name=MySQL 5.7 Community Server
baseurl=http://repo.mysql.com/yum/mysql-5.7-community/el/6/$basearch/
enabled=0
gpgcheck=1
gpgkey=file:///etc/pki/rpm-gpg/RPM-GPG-KEY-mysql
[mysql80-community]
name=MySQL 8.0 Community Server
baseurl=http://repo.mysql.com/yum/mysql-8.0-community/el/6/$basearch/
enabled=0
gpgcheck=1
gpgkey=file:///etc/pki/rpm-gpg/RPM-GPG-KEY-mysql
[mysql-tools-preview]
name=MySQL Tools Preview
baseurl=http://repo.mysql.com/yum/mysql-tools-preview/el/6/$basearch/
enabled=0
gpgcheck=1
gpgkey=file:/etc/pki/rpm-gpg/RPM-GPG-KEY-mysql
The YUM repository is now updated and should show the MySQL 5.6 repository.
# yum repolist

# yum install mysql-community-server
# service mysqld start
# chkconfig mysqld on
Open a browser and check that httpd server is
working for Cloudera Manager 5.9.1 local repository.


#
/usr/share/cmf/schema/scm_prepare_database.sh mysql -h nn.cdh.demo -u root -p
--scm-host nn.cdh.demo scm scm scm


# yum install mysql-community-server
# service mysqld start
# chkconfig mysqld on
ii) Configuration of MySQL Database
Next we will configure MySQL as an external database for our setup.
The below command output is trucated intentionally.
# mysql_secure_installation
Enter current password for root (enter for none):
Set root password? [Y/n] y
New password:
Re-enter new password:
Password updated successfully!
Reloading privilege tables..
... Success!
Remove anonymous users? [Y/n] y
... Success!
Disallow root login remotely? [Y/n] n
Remove test database and access to it? [Y/n] y
Reload privilege tables now? [Y/n] y
... Success!
All done! If you've completed all of the above steps, your MySQL
installation should now be secure.
Thanks for using MySQL!
Cleaning up…
Login into the MySQL database and create a test database.
# mysql -u root -p
mysql> create database test DEFAULT CHARACTER SET utf8;
mysql> grant all on test.* TO 'test'@'%' IDENTIFIED BY 'test';
Creating Database for Activity Monitor
Database Name: amon
Username: amon
Password: amon
mysql> create database amon DEFAULT CHARACTER SET utf8;
mysql> grant all on amon.* TO 'amon'@'%' IDENTIFIED BY 'amon';
Creating Database for Reports Manager
Database Name: rman
Username: rman
Password: rman
mysql> create database rman DEFAULT CHARACTER SET utf8;
mysql> grant all on rman.* TO 'rman'@'%' IDENTIFIED BY 'rman';
Creating Database for Hive Metastore Server
Database Name: metastore
Username: hive
Password: hive
mysql> create database metastore DEFAULT CHARACTER SET utf8;
mysql> grant all on metastore.* TO 'hive'@'%' IDENTIFIED BY 'hive';
Creating Database for Sentry Server
Database Name: sentry
Username: sentry
Password: sentry
mysql> create database sentry DEFAULT CHARACTER SET utf8;
mysql> grant all on sentry.* TO 'sentry'@'%' IDENTIFIED BY 'sentry';
Creating Database for Cloudera Navigator Audit Server
Database Name: nav
Username: nav
Password: nav
mysql> create database nav DEFAULT CHARACTER SET utf8;
mysql> grant all on nav.* TO 'nav'@'%' IDENTIFIED BY 'nav';
Creating Database for Cloudera Navigator Metadata Server
Database Name: navms
Username: navms
Password: navms
mysql> create database navms DEFAULT CHARACTER SET utf8;
mysql> grant all on navms.* TO 'navms'@'%' IDENTIFIED BY 'navms';
Creating Database for Oozie
Database Name: oozie
Username: oozie
Password: oozie
mysql> create database oozie;
mysql> grant all privileges on oozie.* to 'oozie'@'nn.cdh.demo' identified by 'oozie';
mysql> grant all privileges on oozie.* to 'oozie'@'%' identified by 'oozie';
Creating Database for Hue
Database Name: hue
Username: hue
Password: hue
mysql> create database hue;
mysql> grant all privileges on hue.* to 'hue'@'nn.cdh.demo' identified by 'hue';
Verification
Run the below commands to verify the MySQL 5.6 installation.
Login into MySQL shell
# mysql -u root -p
mysql> show tables;
mysql> show databases;
iii) Installation of MySQL JDBC Driver
Location: Namenode (nn.cdh.demo)
The MySQL JDBC driver needs to be installed on all nodes. The MySQL 5.6 requires driver version 5.1.26 or higher. Hence, we shall install driver version 5.1.40.
Download the driver from this link. Alternatively we can download the driver directly using the below wget command.
# wget -c https://dev.mysql.com/get/Downloads/Connector-J/mysql-connector-java-5.1.40.tar.gz
# tar -xzvf mysql-connector-java-5.1.40.tar.gz
# cd mysql-connector-java-5.1.40
# ln -s mysql-connector-java-5.1.40-bin.jar /usr/share/java/mysql-connector-java.jar
CLOUDERA INSTALLATION
Cloudera
Manager can be installed using both local yum repository as well as internet
based repositories. We will install using local repository.
i) Cloudera Manager Local YUM Repository Configuration
Location: Namenode (nn.cdh.demo)
Generally a local yum repository is configured
to save both bandwidth and time.
Create a directory in "/var/www/html"
location and download the rpms.
# mkdir -p /var/www/html/CDH591/cm/5.9.1
# cd /var/www/html/CDH591/cm/5.9.1
Download the
rpms for Cloudera Manager 5.9.1 using the below commands.
# wget -c http://archive.cloudera.com/cm5/redhat/6/x86_64/cm/5.9.1/RPMS/x86_64/cloudera-manager-agent-5.9.1-1.cm591.p0.8.el6.x86_64.rpm
# wget -c http://archive.cloudera.com/cm5/redhat/6/x86_64/cm/5.9.1/RPMS/x86_64/cloudera-manager-daemons-5.9.1-1.cm591.p0.8.el6.x86_64.rpm
# wget -c http://archive.cloudera.com/cm5/redhat/6/x86_64/cm/5.9.1/RPMS/x86_64/cloudera-manager-server-5.9.1-1.cm591.p0.8.el6.x86_64.rpm
# wget -c http://archive.cloudera.com/cm5/redhat/6/x86_64/cm/5.9.1/RPMS/x86_64/cloudera-manager-server-db-2-5.9.1-1.cm591.p0.8.el6.x86_64.rpm
# wget -c http://archive.cloudera.com/cm5/redhat/6/x86_64/cm/5.9.1/RPMS/x86_64/enterprise-debuginfo-5.9.1-1.cm591.p0.8.el6.x86_64.rpm
# wget -c http://archive.cloudera.com/cm5/redhat/6/x86_64/cm/5.9.1/RPMS/x86_64/jdk-6u31-linux-amd64.rpm
# wget -c http://archive.cloudera.com/cm5/redhat/6/x86_64/cm/5.9.1/RPMS/x86_64/oracle-j2sdk1.7-1.7.0+update67-1.x86_64.rpm
# wget -c http://archive.cloudera.com/cm5/redhat/6/x86_64/cm/RPM-GPG-KEY-cloudera
# createrepo .

Location: All nodes
Create repo file on all
nodes that will be used for Cloudera Manager daemons installation.
# vi
/etc/yum.repos.d/cm591.repo
[CM-5.9.1_LocalRepository]
name=CM-5.9.1_LocalRepo
baseurl=http://192.168.56.101/CDH591/cm/5.9.1
enabled=1
gpgcheck=0
Repository Verification
# yum repolist
Preparing Parcels Repository for later use
Location: Namenode
(nn.cdh.demo)
# mkdir
/var/www/html/cloudera591/parcels
# cd
/var/www/html/cloudera591/parcels
# wget -c http://archive.cloudera.com/cdh5/parcels/5.9.1.4/CDH-5.9.1-1.cdh5.9.1.p0.4-el6.parcel
# wget -c http://archive.cloudera.com/cdh5/parcels/5.9.1.4/CDH-5.9.1-1.cdh5.9.1.p0.4-el6.parcel.sha1
# wget -c http://archive.cloudera.com/cdh5/parcels/5.9.1.4/manifest.json
Open a browser and verify
the http server working
http://192.168.56.101/CDH591/parcelii) Cloudera Manager 5.9.1 Installation
We will begin
installing Cloudera Manager version 5.9.1.
Location:
Namenode (nn.cdh.demo)
# cd
/var/www/html/CDH591/cm/5.9.1
# yum install cloudera-manager-serveriii) Cloudera Manager Configuration
Create SCM Database in MySQL Database
Location: Namenode
(nn.cdh.demo)

(Note: Skipping this step
throws "cloudera-scm-server dead but pid file exists" error)
Starting Cloudera Manager Server Daemon
# service
cloudera-scm-server start
Verification
Once the Cloudera scm server
daemon has started, you will notice the 7180 port running. Run the below
command to verify.
# netstat -ntulp | grep
7180
iv) CDH 5.9.1 Installation
Finally,
point your browser to the below mentioned address
http://192.168.56.101:7180
Enter the
login credentials as mentioned below.
Username:
admin
Password: admin
Click on "Continue" tab.

Select "Cloudera Enterprise Data Hub
Edition Trial" and click on "Continue".

Click on "Continue".

Specify the hosts and click on "Search".

After the namenode and datanodes are detected,
select all nodes and click on "Continue".

We will install CDH using local parcel
repository.

Click on "More Options" to configure
parcel repository paths are related settings. Click "Save Changes"
and click on "Continue".

If you still haven't installed Oracle JDK, the
installation wizard will automatically install it in all nodes. Since, we have
already installed the latest version of Oracle JDK we will click on
"Continue". It is always recommended to install the latest Oracle JDK
prior to installing CDH.

We can configure CDH to run its various
components like HDFS, HBase, Hive, etc using a single user mode. But we will go
for distinct users for various CDH components. Click on "Continue" to
proceed further.

The next screen asks to provide the SSH login
credentials and in our case we will provide "root" user credentials.
Click "Continue" to proceed.

Installation of CDH begins in this step. Check
for the logs in "/var/log/".

Click "Continue" to go forth.

After the selected parcels have been
successfully downloaded, distributed and activated in all nodes, click on
"Continue".

Verify that there are no pending tasks on the
Validations page. You can correct the errors and click on "Run Again"
to recheck the validations.

Go through the versions of various Hadoop
components that are going to be installed and click on "Finish".

Choose the services that you want to install. We
have selected "Custom Services" where we will install only HDFS,
MRv2, ZooKeeper, Oozie & Hive. We can always go for installation of
additional components as per requirement. Click on "Continue".

Customize the roles for each node as per your
requirement and click on "Continue".

Setup the databases for the respective Hadoop
components.

Review the configuration and click on
"Continue".

Now the Hadoop services will start to run for
the first time on the cluster.

After the “First Run Command” has successfully
completed, the Cloudera Manager Admin Console will open up for administration
activities like configuring, managing and monitoring CDH.

Now the installation of multi-node Cloudera cluster is complete.
Related Posts:
TAGS: cdh 5.9.1, cm, cdh 5.9.1 installation guide, cdh 5.9.1 manual installation, cloudera hadoop, cloudera hadoop cdh 5.9.1 installation, hadoop multinode cluster installation, install and configure cloudera hadoop latest version, install cdh 5.9.1, install cloudera hadoop multinode cluster, install cloudera hadoop, latest cloudera hadoop, multinode hadoop cluster installation
Hey, Wow all the posts are very informative for the people who visit this site. Good work! We also have a Website. Please feel free to visit our site. Thank you for sharing. Well written article Thank You for Sharing with Us pmp training institute in chennai | pmp training class in chennai | pmp training near me |project management training in chennai | project management certification online | project management course online |
ReplyDeleteHashprompt >>>>> Download Now
ReplyDelete>>>>> Download Full
Hashprompt >>>>> Download LINK
>>>>> Download Now
Hashprompt >>>>> Download Full
>>>>> Download LINK tt